Knowledge For All

How to configure Fanvil IP-Phone to BTEL2.0 using TLS (to work aside OUC)

Article ID: 208
Last updated: 12 Jun, 2024

This document describes how to configure an Fanvil IP-Phone to connect to BTEL2.0 (to work aside OUC as well)

In this document we will use a Fanvil 123 and extension 1001 from Tenant TEST but other Fanvil phone should be similar.

IMPORTANT NOTE: If options as per this KB are not available, e.g. TLS1.2 you have to upgrade to the latest Firmware. E.g. for the X1/X1P need to upgrade to FW X1-2.14.0.7386

TIP: If the phone is not new it's recommended to do a factory reset.

Settings not mentioned in this article as default OK.

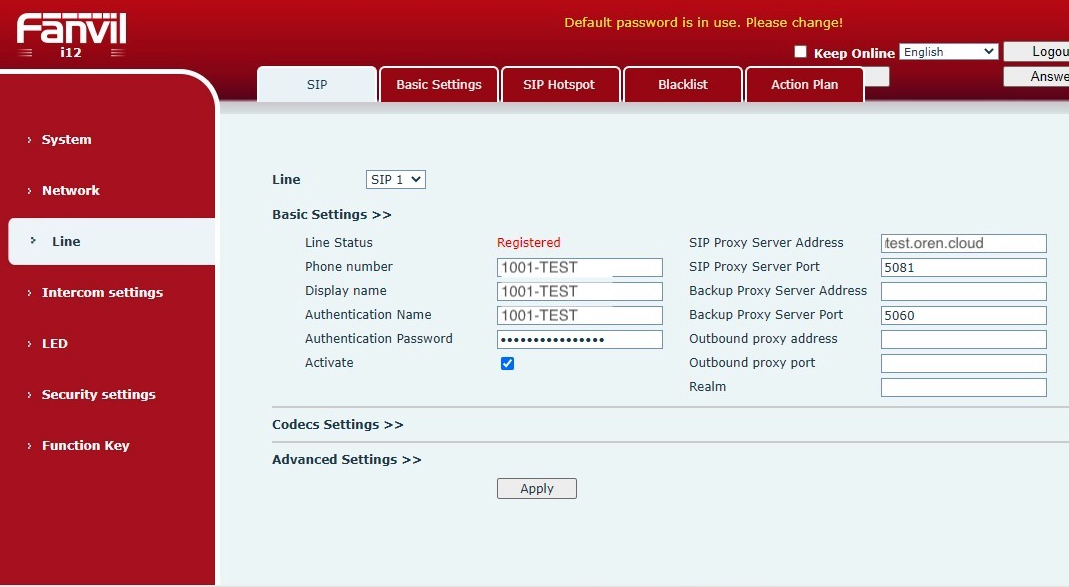
At Line -> Basic Settings

  1. At Phone Number: <Your Extension Username>, e.g. 1001-TEST
  2. At Display Name: <Your Extension Username>, e.g. 1001-TEST
  3. At Authentication Name: <Your Extension Username>, e.g. 1001-TEST
  4. At Authentication Password: <Your Extension Password>
  5. Enable Checkbox: Activate
  6. At SIP Proxy Server Address: <Your Domain Name> e.g. test.oren.cloud
  7. At SIP Procy Server Port: 5081

At Line -> Codecs Settings

  1. Set 1st OPUS, 2nd Ulaw / G711u), 3rd Alaw / G711a

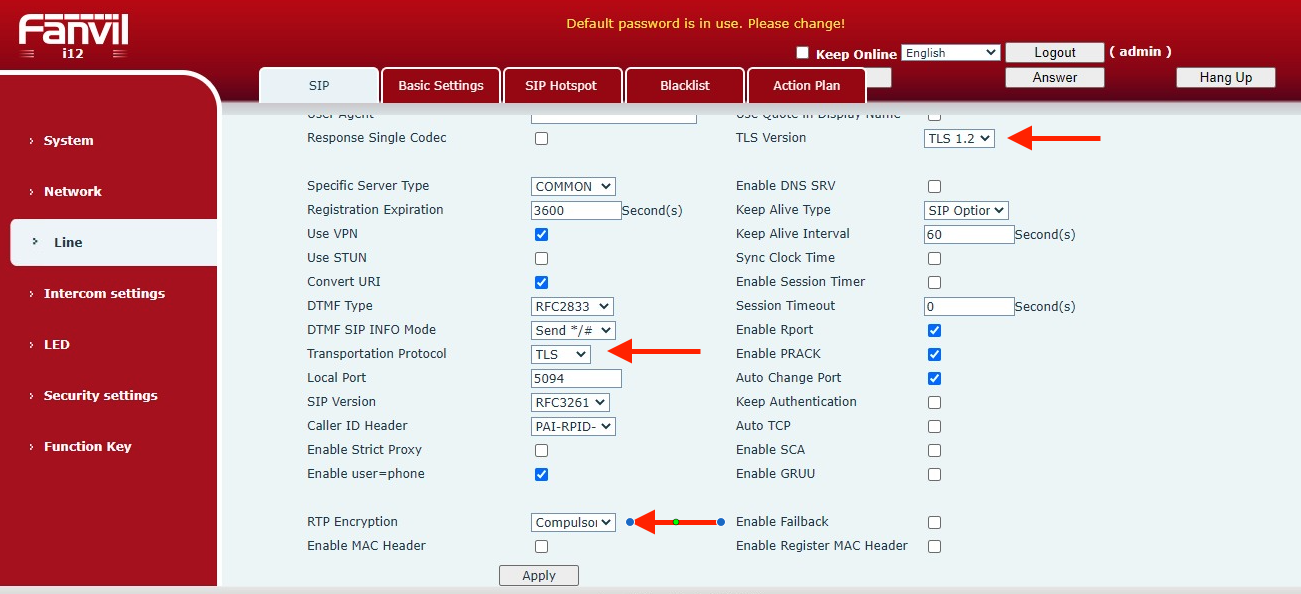
At Line -> Advanced Settings

  1. At TLS Version select: TLS1.2
  2. At Transport Protocol select: TLS
  3. At RTP Encryption select: Compulsory

At Security Settings -> Password

  1. IF the phone is under ORENcloud Maintenance Change the Administrator Password to OC Phone Admin Password.

Reboot the -IP-Phone and make a test call (*60 Date and Time Announcement)

DONE.

Screenshots of the various settings mentioned above.

Fanvil-i12-Line-Basic-Settings

Fanvil-i12-Line-Basic-Advanced

This article was:  
Report an issue
Article ID: 208
Last updated: 12 Jun, 2024
Revision: 5
Views: 576
Comments: 0


This website uses cookies to ensure you get the best experience on our website. Learn More